|
| |
|
|
|
|
Text and photography by Richard Harris |
|
|
|
| An axle assembly from one of the many vehicles that spilled onto the sand when the ship sank. So intent was I on looking at rusty objects, I never even noticed the clouds of fish that hovered around the wreck! |
|
|
|
|
|
Hand over hand, I desperately pull myself down the nearly horizontal shot line, squinting into the gloomy depths as I yearn for a glimpse of the wreck in the darkness below. With a full knot of current, it is almost impossible to drag my heavily laden body into the deep. Drysuit, rebreather, two large bailout cylinders, camera, and all the other paraphernalia of technical diving impede my progress into the current. If I loosen my grip for even a moment, it will pluck me off the line and whisk me away. Ahead of me, Craig Howell is working just as hard, staring intently at the rope before him and willing the wreck to come into view. In the lead, Craig Challen is making much better progress armed with a scooter, and has nearly reached our quarry…the wreck of the Liberty ship William Dawes.
Two other divers behind me make the decision to abort the dive as one starts to suffer the effects of increased carbon dioxide in the breathing loop. I am now 80m below the surface, and my left sling tank carrying backup gas suddenly slips from its restraining bungee. It takes all my strength to keep hold of the rope and reattach it. My breathing is becoming laboured, and I fear a CO2 hit at any time. An inner voice tells me I, too, should turn and head for the surface just as I look towards the seabed one last time, when I make out the first outline of the massive steel hulk below. With renewed determination, I consciously slow down my breathing and settle myself on the rope one last moment before making the final descent to the seabed at over 130m. On the sand, I am still breathing hard and I flip onto open circuit for a moment to settle myself further. At last, I am back under control and ready to explore this ship that has been so slow to reveal its secrets.
The second deepest wreck ever dived off the Australian coast, the Dawes has been visited on only three previous occasions. Those dives by our group and the Sydney Project team had been plagued with difficulties, and had added little to the knowledge of the wreck. Although this unpleasant descent had taken ten full minutes, we now had fifteen minutes to complete our planned exploration, photography, and commence the long ascent back to the surface. Challen scootered off to circumnavigate the wreck, while Craig Howell and I explored our immediate vicinity. It rapidly became clear that we were at one end of the wreck. Swimming to our left, an anchor appeared in its hawser hole and the bow loomed large above us. Now it was obvious why we could not orient ourselves on our first dive to this WW2 casualty…she was lying completely upside down with her superstructure and rigging in the sand. All that was on view was the smooth upturned hull draped in trawler’s nets and some debris in the surrounding sand. |
|
|
|
| Left: Craig Howell and Craig Challen take a last look at the wreck as they commence the four-hour ascent from 130m. The current tries to pluck them from the shot line like flags in the wind. |
|
|
|
|
|
|
|
With limited options for exploration, we turn our attention to the scattered objects around us. On our first dive several months earlier, I thought I had caught a glimpse of a small field artillery gun on the sand. In front of me now lay a truck’s axle assembly with a remarkably similar appearance! Craig H picks up a steering wheel from the sand and pictures himself in the ancient vehicle. So easy to forget our hostile environment for a moment, and suddenly we are really enjoying the dive. Sorting through the rubbish, we see a drinking glass and a heavy rectangular object that is perhaps a truck battery. Working our way along the wreck, we carefully avoid the old trawler’s nets that helped locate the wreck, but now present a danger to the unwary diver.
Twenty-three minutes and time to get back to the shot line that is illuminated by my flashing strobe. Challen scooters back into view right on queue, and his eyes tell the story of a fantastic dive. We can’t wait to hear his tale! After twenty-five minutes at depth, we now have a 4 - hour ascent to the surface in the cool Pacific waters off the New South Wales coast. As we lift above the protection of the wreck, I feel the current start to pull at my body again, and remember that the hard part of the dive is really just beginning. At 20m depth, we release the decompression station from the main shot line and suddenly it seems quiet and still as we drift with the current. I hadn’t realized how much noise the water rushing past my face and the strumming of the shot line was making! All is peaceful and I start to relax for the first time, even though the bulk of the decompression time still lies ahead.
Craig Challen indicates he has scootered all the way around the wreck. However, the ship, which should be over 130m long, comes to an abrupt finish at perhaps 70m from the bow. Here, it is evident that the destructive force of the torpedo that sank her has entirely removed the stern section. A debris trail leads out over the sand, and perhaps another part of the ship lies in that direction? Craig can also confirm that the wreck lies face down with no superstructure on view.
An ache in my right elbow brings me out of my daydream, and indicates that the decompression is not going as smoothly as planned. I drop a little deeper to see if that brings relief. It does, and so begins a lengthy exit from the water; alternately rising up to my next stop then having to drop slightly when the pain recommences. By the time my planned decompression time is complete, the elbow is pain free and I cautiously rise the last few metres to the surface. Within minutes, the arm is starting to ache more than ever, and I contemplate a return down the line. But the seas are building, so I decide the safest place for me is back on the Binjarra, our trusty charter operated by Bermagui master mariner, Keith Appleby. Keith was the first man to locate and take divers to these wrecks, working closely with the team from the Sydney Project.
Our support diver, Mike Campbell, is in the water and helps me remove my sling tanks. In the heaving swells, the stern of Binjarra lifts high above me then crashes down spraying out sea foam and pushing me away. Picking my moment, I seize the ladder and am plucked out of the water by the next wave. I flop onto the deck like an exhausted fish, and the crew helps me out of my gear. Over onto a protected part of the deck, and I go back onto the rebreather to breathe oxygen for the next half hour. In that short time, the pain settles again. Some anti-inflammatory medication and plenty of rehydration and I remain symptom free, narrowly escaping a trip to the chamber. For the two Craigs, decompression is uneventful and we return to port cheered by our first really successful dive to the William Dawes. |
|
 |
|
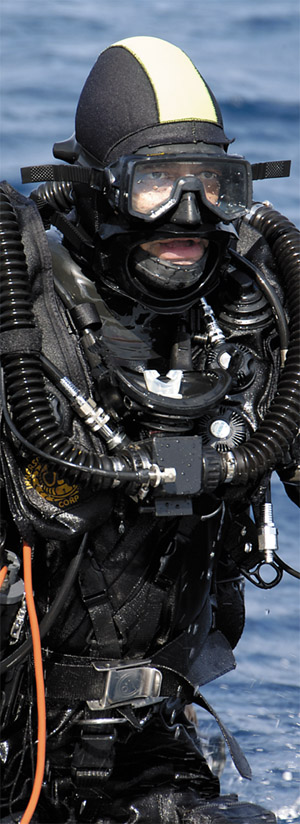
Above: Wearing a full face mask on his Megalodon rebreather, Craig Challen looks pretty business-like coming up the ladder!
|
|
|
Below: Craig Howell lost in his thoughts behind the wheel of a 1940’s truck!
|
|
|
|
|
|
|
|
|
|
|
|
|
|
 |
|
Acknowledgments:
With thanks to Michael Campbell, our support diver on the Binjarra. To the master mariner, Keith Appleby, who locates the wrecks, has the confidence to let us dive them, and drops the shot with laser precision! And to our fellow wreck divers in the Sydney Project who have led the way and been kind enough to share their hard-won information.
William Dawes – Liberty Ship
Between 1941 and 1945, 16 American shipyards turned out over 2700 vessels to provide much needed transports for the British and U.S. fleets. Designed only to last five years, many of them broke apart during service due to issues with the newer welding methods, whilst many others met their fate at the hands of German raiders, U-Boats and Japanese submarines. In fact, today only two Liberty ships survive in an operational state.
At 7000 tons deadweight and 135m in length, these identical vessels were powered by twin triple-expansion steam engines with two oil-fired boilers. Their only armament was a stern mounted 4” gun and a selection of small anti-aircraft guns.
On route to the Pacific theatre with trucks and vehicles as its primary cargo, the William Dawes was one such Liberty ship that was attacked by a Japanese 1-11 submarine off the New South Wales Coast, opposite Tathra, on July 22nd, 1942. Two torpedoes struck near the stern, taking the ship and five crewmembers to their deaths. It appears the stern section was blown off, and as the shipped rolled and sank keel upwards, many of the heavy vehicles in the holds spilled out onto the sand.
The wreck was first dived by Samir Alhafith and Dave Apperley in October 2004; and, including our recent dive, has been visited only four times as of November 2006.
Note: Oxygen and rehydration are recommended first aid procedures for decompression sickness, but should be followed by immediate consultation with an appropriate expert in diving medicine. |
|
|
|
|
|
|
|
|
|
|
|
|
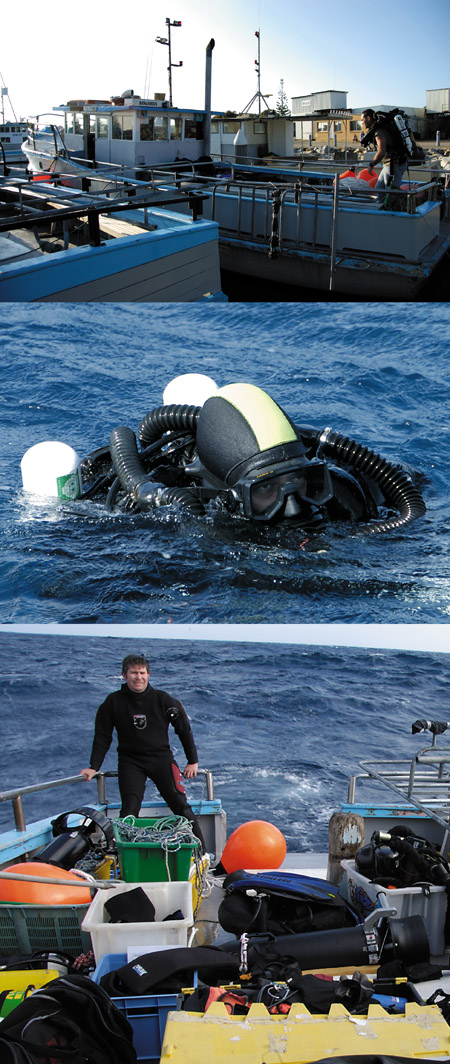
Above Top: Keith Appleby’s trusty fishing boat Binjarra at dock in Bermagui. Divers load their gear in the dawn light.
|
|
Above Middle: A support diver enters the water to help Craig Challen to the stern of Binjarra as the seas build at the end of the dive. Grasping a line, he pulls himself to the boat. |
|
Above Bottom: The divers surfaced to rough conditions 5 hours after leaving the surface. Craig Challen and Craig Howell relax with support diver Mike Campbell after the dive.
|
|
Below: The ship’s anchor in its hawser hole at the bow of the ship, with the bow itself reaching skyward. Nets and buoys from passing trawlers drape the front of the ship. |
|
|
|
|
|
|
|
|
|
|
|
|
| |
|